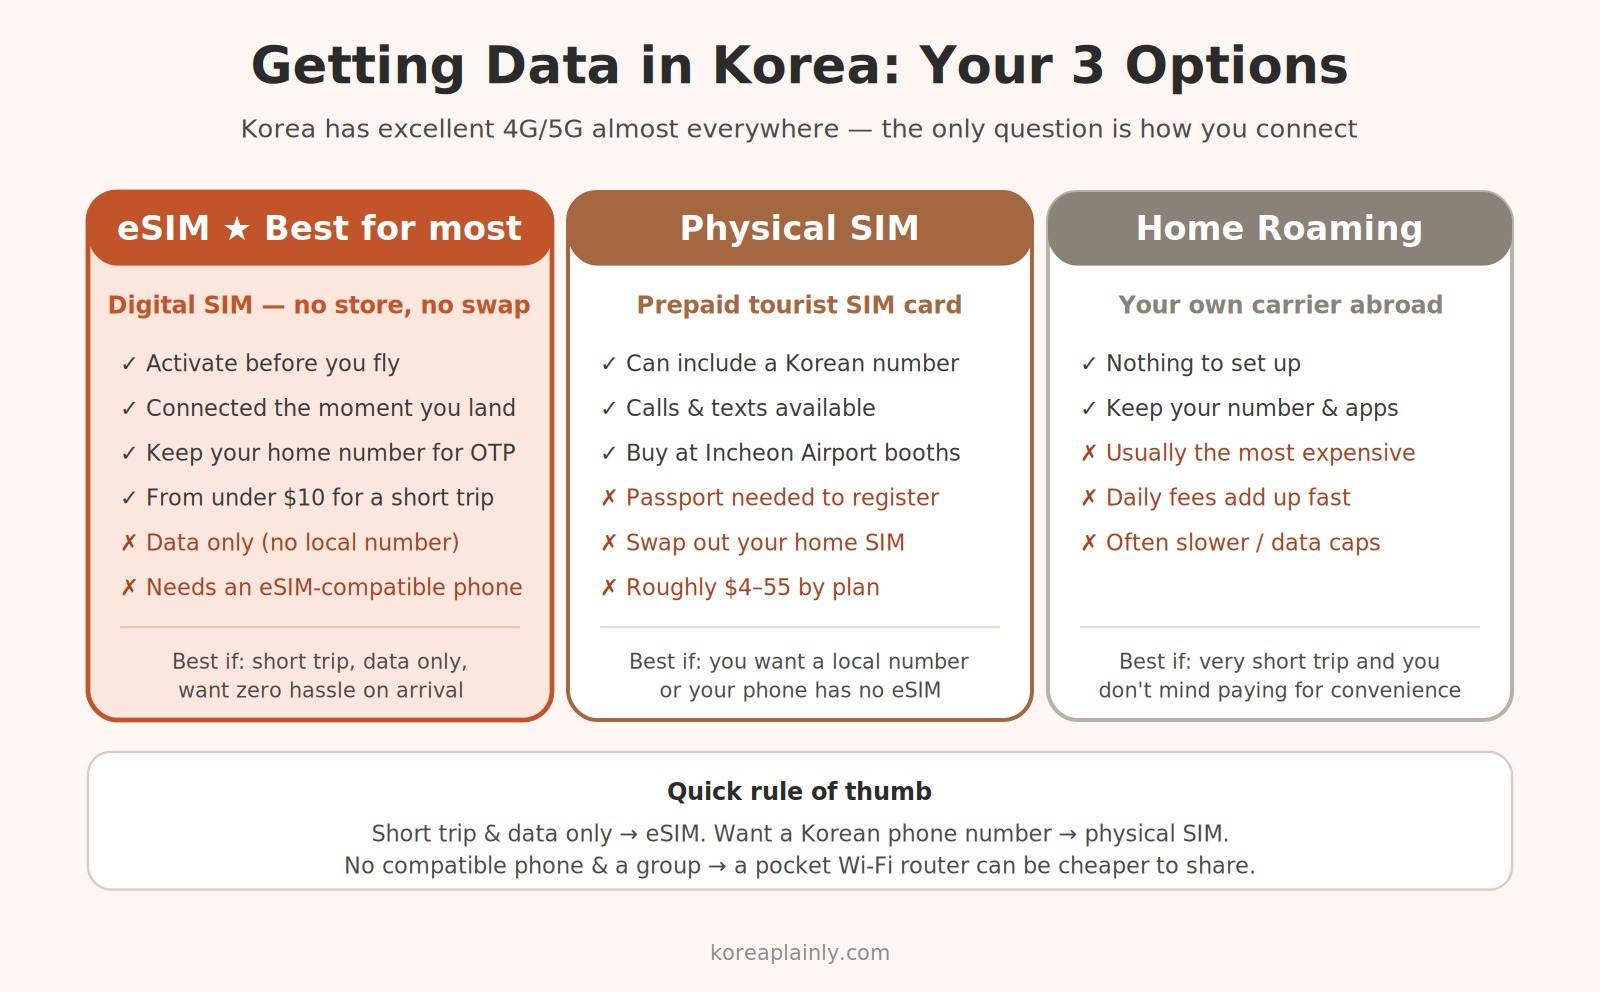
Korea is one of the most connected countries on Earth. Fast 4G and 5G reach almost everywhere — the middle of Seoul, a subway platform four floors underground, the top of a mountain trail. So the question isn’t whether you’ll have signal; it’s how you’ll connect in the first place. And that one decision, made before you fly, shapes how smooth your first day is. Land with it sorted and you walk off the plane already online, pulling up directions and a translation app. Land without it and you’re hunting for airport Wi-Fi with a dead phone and a queue in front of you. Here are your three options, what each really costs, and — the part most guides skip — how to match one to your specific trip.
Why you need data in Korea (more than in most countries)
It’s worth understanding why this matters before choosing. Korea has generous free Wi-Fi in cafes, subways, and shops, so in theory you could scrape by without any plan. In practice, two things make reliable data close to essential.
First, navigation. Google Maps does not do turn-by-turn walking or driving directions in Korea — a national data-export restriction means the local apps do the real work. You’ll be using Naver Map or KakaoMap, and those need a live connection to route you, show real-time bus arrivals, and read subway exits. Second, everything else runs on your phone too: Papago for translating menus, Kakao T for taxis, KakaoTalk for talking to a guesthouse, and card or QR payments. Free Wi-Fi is fine sitting down in a cafe; it’s useless standing on a street corner trying to find that cafe. So while data isn’t legally required, it’s what makes the whole trip flow.
Option 1: eSIM — best for most travelers
An eSIM is a digital SIM you install on your phone before you fly, with no physical card to insert or swap. You buy a plan online, install it in a couple of minutes over your home Wi-Fi, and it stays dormant until you arrive — then connects to a Korean network automatically the moment you land at Incheon.
The advantages stack up fast for a typical tourist. Plans start under $10 for a short trip and are usually cheaper than a physical tourist SIM. Because your regular SIM never leaves the phone, you keep receiving texts and banking codes on your home number — a real convenience when a two-factor login pops up mid-trip. And there’s no queue, no passport registration, no fiddling with a tiny card and an ejector pin after a ten-hour flight.
The trade-offs are narrow but worth knowing. An eSIM is data-only — you don’t get a Korean phone number, so you can’t receive local verification texts (which a few Korean delivery apps or services require). And your phone must be eSIM-compatible: most iPhones from the XS onward and recent flagship Android phones are, but budget and older models often aren’t. Check your phone’s settings for an “Add eSIM” or “Add Data Plan” option before you buy.
Option 2: physical SIM — best if you want a Korean number
A prepaid tourist SIM is the classic approach: a physical card that gives you both data and an actual Korean phone number. That number is the reason to choose it. If you need to make local calls, or receive Korean verification texts — for certain deliveries, reservations, or app sign-ups that check a domestic number — a physical SIM does what an eSIM can’t.
You can buy one at the arrivals-hall booths of the three carriers (SK Telecom, KT, LG U+) at Incheon; staff there register these for foreign visitors constantly, so it’s routine, though you’ll need your passport for the mandatory registration. Prices run roughly $4–55 depending on length and data. The two downsides: you have to physically swap out your home SIM (so keep it somewhere safe), and buying at the airport is convenient but rarely the cheapest — ordering ahead for pickup, or choosing an eSIM instead, usually saves money.
Option 3: home roaming — simplest, usually priciest
Switching on your own carrier’s international roaming takes zero setup — you keep your number and apps and just start using data abroad. For a very short trip where you’d rather pay for total convenience, it’s defensible. But it’s typically the most expensive route by a wide margin, with daily fees that pile up and, often, slower speeds or tight data caps. For most trips longer than a couple of days, an eSIM does the same job for a fraction of the price.
So which should you choose?
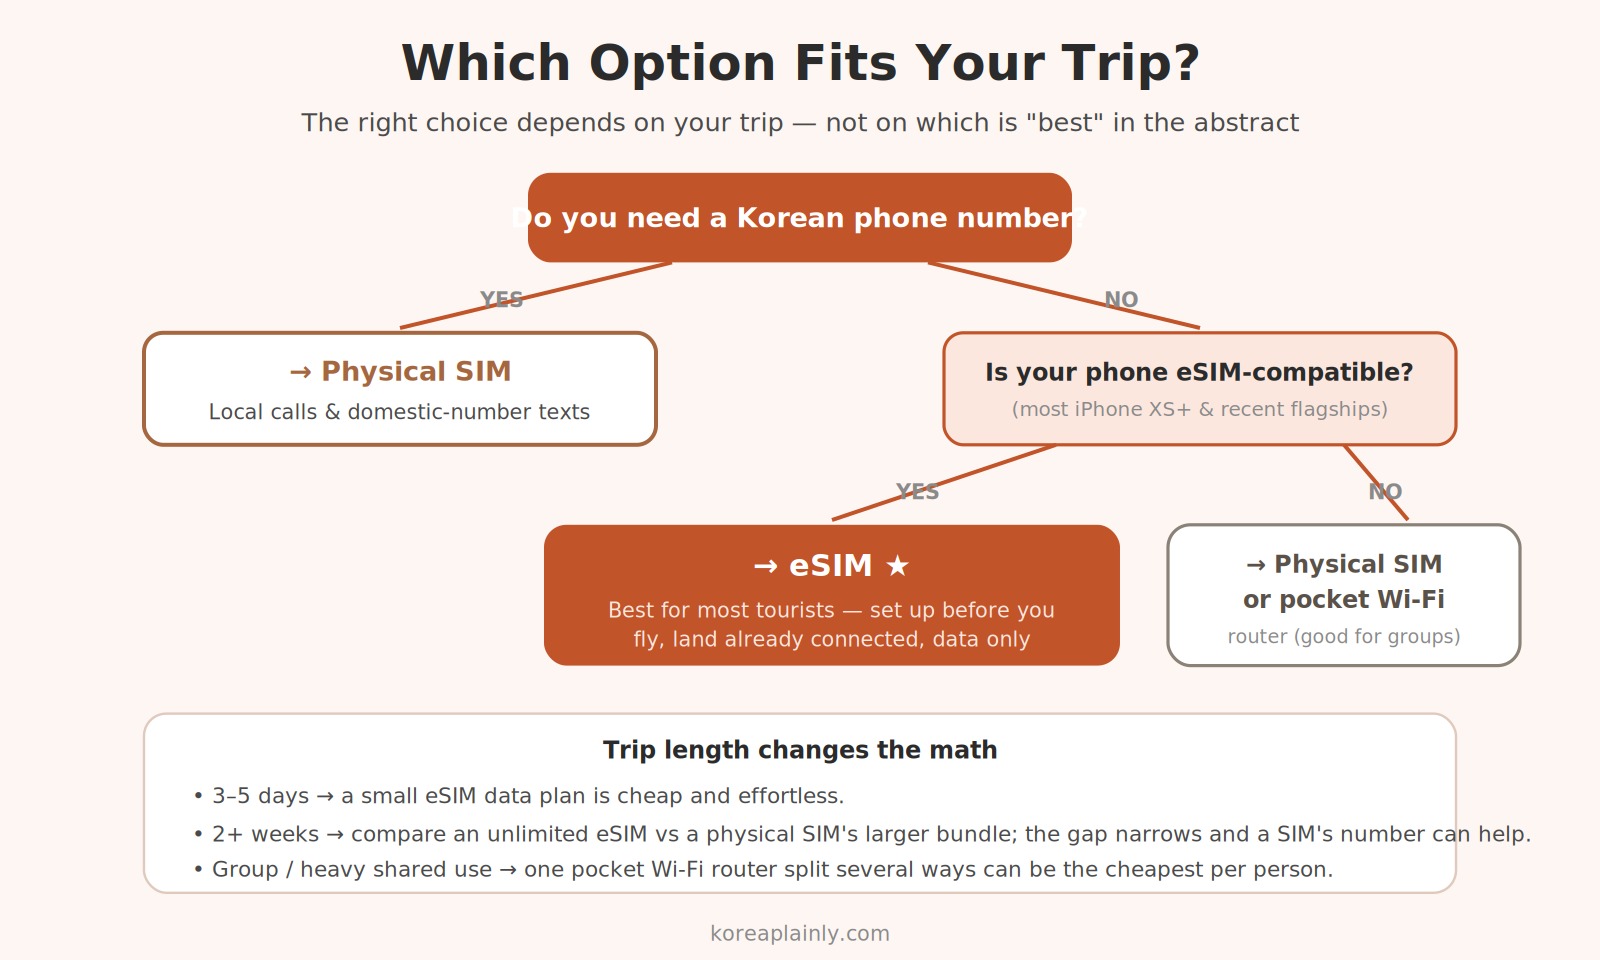
The right answer depends on your trip, not on which option is “best” in the abstract:
- Short trip, data only, want zero hassle: eSIM. This covers the large majority of tourists. Set it up at home, land connected, done.
- You need a Korean phone number (local calls, domestic-number verification): physical SIM.
- Your phone doesn’t support eSIM: physical SIM, or a pocket Wi-Fi router.
- Traveling as a family or group with heavy shared use: a rented pocket Wi-Fi router can sometimes be the cheapest per-person option, since several people share one device — though only one person has data if the group splits up.
Trip length changes the math too. For 3–5 days, a small eSIM data plan is cheap and effortless. For two weeks or more, compare an unlimited eSIM plan against a physical SIM’s larger bundles — at longer durations the gap narrows and a SIM’s included number can tip the balance.
How much data do you actually need?
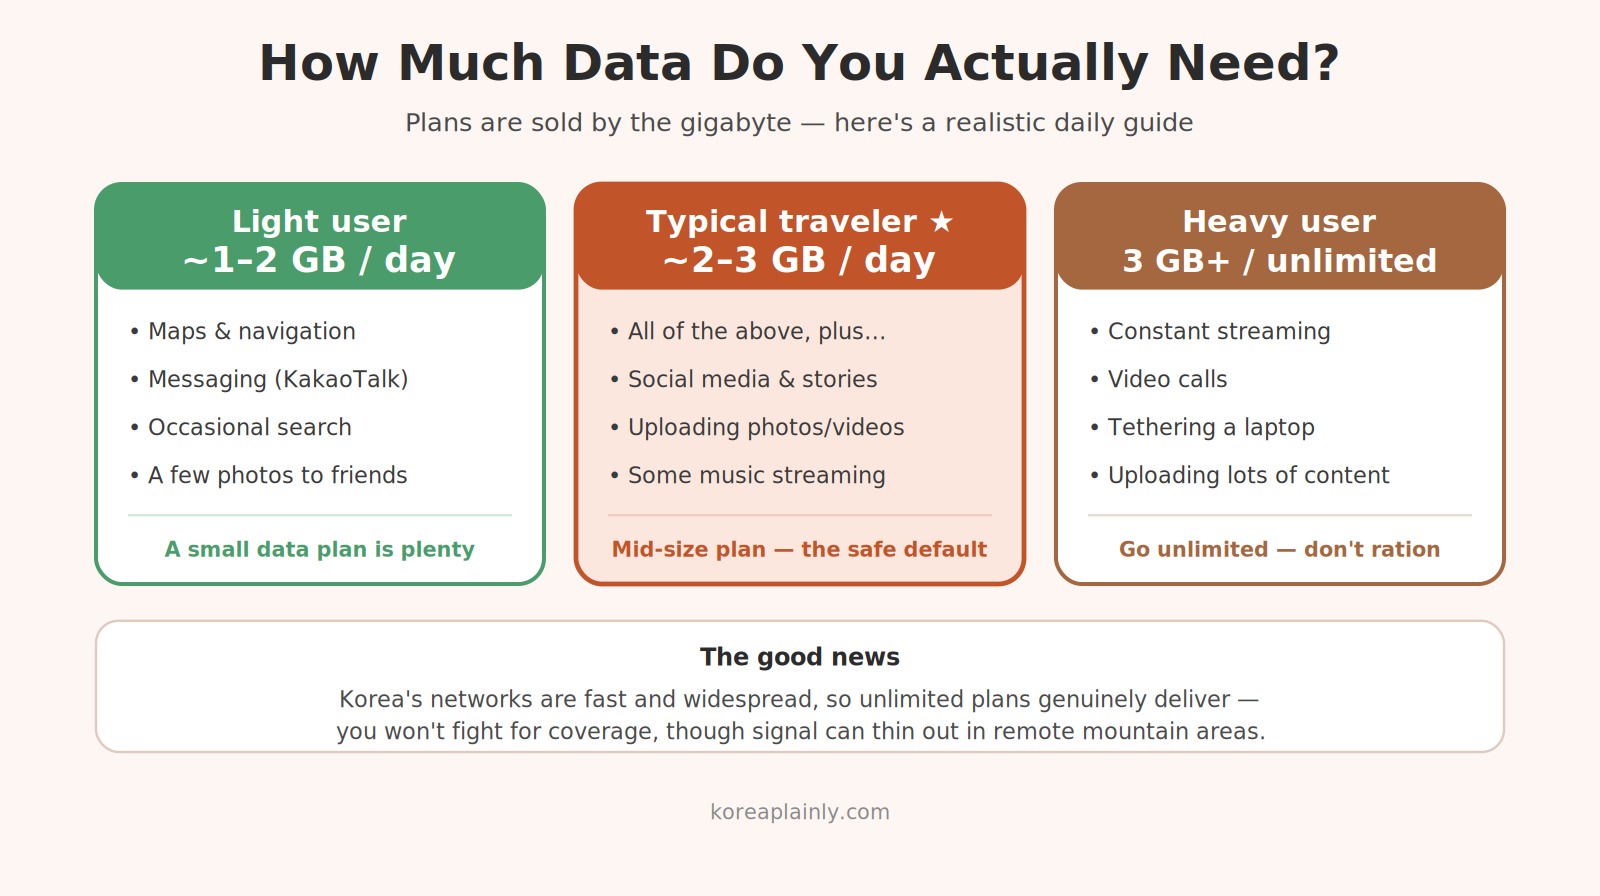
Plans are sold by the gigabyte, and travelers routinely over- or under-buy. A rough guide: if you’re mainly using maps, messaging, and the occasional search, 1–2 GB a day is comfortable. If you stream music, upload lots of photos and videos, or tether a laptop, look at 3 GB a day or an unlimited plan so you’re not rationing. Because Korea’s networks are so fast and widely available, unlimited plans genuinely deliver — you won’t be fighting for coverage even off the main tourist trail, though signal can thin out in remote mountain areas.
Setting it up without stress
A few habits save headaches:
- Sort it before you land. Install an eSIM on home Wi-Fi before you fly, or order a physical SIM for airport pickup. The one thing you don’t want is to arrive with a dead phone and no plan.
- Confirm your phone is unlocked before buying any local SIM — a carrier-locked phone won’t accept one.
- Keep your home SIM safe if you swap to a physical card, and remember to switch your eSIM on (and set it as your data line) once you land.
- You can activate on airport Wi-Fi. Incheon has free Wi-Fi, so even if you didn’t set up in advance, you can buy or activate right there before heading into the city.
Get your data sorted before you fly and the rest of Korea unlocks the moment you land — directions, translation, taxis, payments, reservations, all working from the jet bridge. It’s the single easiest thing you can do in advance to make the whole trip smoother.